The power supply unit is the backbone of a computer. If your power supply unit goes bad, the computer doesn’t function properly, or it won’t simply turn on. This article is a detailed guide on how to fix a bad PC power supply unit (PSU).
But before dwelling on that, we’ll see how to diagnose a bad PC PSU and what are the most common issues that cause the power supply unit to go bad.
So, without further ado, let’s get started!
How to Diagnose a Bad PC Power Supply Unit (PSU)?
Your computer might run into problems for several reasons. So, before trying to fix a PSU, you must be 100% sure that this is the component causing the trouble.
Let’s see how to diagnose a bad PC power supply unit:
1. Looking Out for General Symptoms
Here are a few general symptoms indicating that the PC power supply unit has gone bad:
- The computer won’t turn on, but the cooling fans are spinning.
- When you press the power button, a message saying “no power” appears on the monitor.
- Strange noises are coming out of the power supply unit.
- The computer gets turned off out of nowhere.
- Check if your system takes a long time to turn on and makes a rapid beeping sound.
2. Checking With an Alternate Power Supply Unit (PSU)
This is the best and sure way of diagnosing a bad PC PSU. All you need is an alternate PSU which you can borrow from a friend or any other PC. Disconnect the cords from your PSU and attach them to the second one. Now, see if the symptoms go away and if the PC is turning on.
Why Does a PSU Go Bad?
Once you have established that the PSU of your computer has gone bad, we can move on to the next step of repairing the bad PSU. But before that, you must know that PSU isn’t a single piece of hardware. There are hundreds of small components inside it.
So, which component is bad or how to proceed with the repair is a big challenge. Let’s see the most common reasons why a power supply unit goes bad.
1. Poor Connections
As I said, the power supply unit is a combination of numerous small components. All the pieces are connected via soldering joints. If any soldering joint is weak or peeled off, the PSU won’t transmit any power whatsoever. So, before repairing, check that all connections are intact and live.
2. Bad Capacitor
Now any number of components inside the PSU can go bad. But let me say safely that 9 out of 10 times, the power supply unit goes bad due to a blown capacitor. The capacitor is responsible for filtering out the power ripples in the final output of a PSU.
The voltage fluctuations in the main power supply can cause a lot of stress on the capacitor because many big ripples in the output waves pass through it. So, it is very common for a capacitor to go bad.
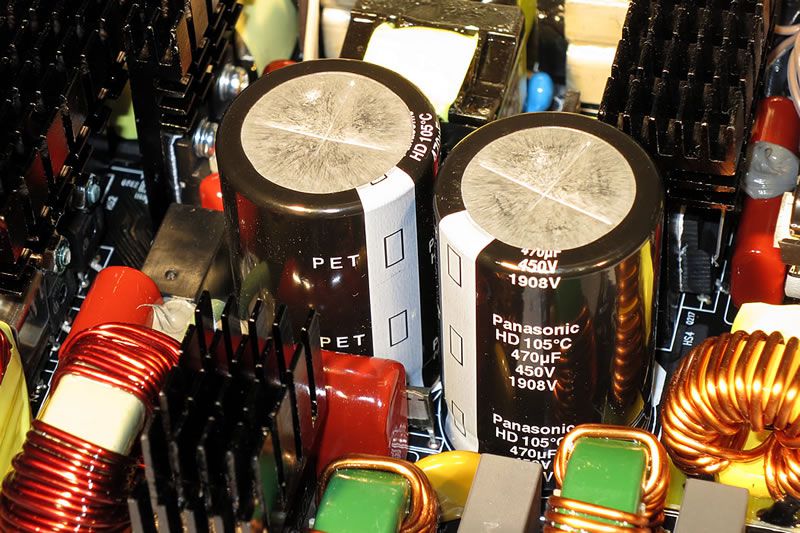
It is quite easy to spot a blown capacitor. You can see visible black marks on the capacitors (Large cylindrical pieces of hardware attached to the main PSU board, see image). Depending on the design, there can be 2 to 5 or more capacitors on a power supply unit. But usually, the largest ones are the culprits.
Why? Because it is where the output waves go first. After passing through it, most of the ripples are filtered out, so the chances of other capacitors going bad are substantially reduced. However, a few other capacitors can also go bad, so look out for those as well.
How to Replace a Capacitor on PC Power Supply Unit (PSU)?
We have established that a bad capacitor is the most common cause of a bad PC power supply unit. Now, we will see how to replace a bad capacitor to repair the PSU.
So, let me put it step by step for you!
Step 1# Disconnecting the Cables
- The first and foremost step is to switch off the main power.
- Then disconnect the power cords of the computer.
- After that, you may open the casing of your computer.
- Identify the power supply unit and disconnect all the cables coming out of it.
- There would be cables going to the motherboard and graphic card. Disconnect all of them.
- While disconnecting, tag all the cables so you can easily connect them during reassembly.
Step 2# Take Precaution
- Before taking PSU out of the CPU, ensure it is properly discharged.
- If your computer runs for a long period, it might still hold some charge.
- Take an AVO meter and check the voltage between random terminals.
- If the voltage is low than 24 V, it is safe to proceed.
- Otherwise, wait for the PSU to get discharged.
- Always wear rubber gloves to avoid getting electrocuted.
Step 3# Getting into the Power Supply Unit
- The PSU is held in place with screws. Open these screws and take the PSU out.
- The PSU itself is enclosed in a metal or plastic body.
- Open the screws or clips that hold the casing of the PSU.
- You need to take the main PSU board out for access to the bad components.
Step 4# Spotting the Bad Capacitors
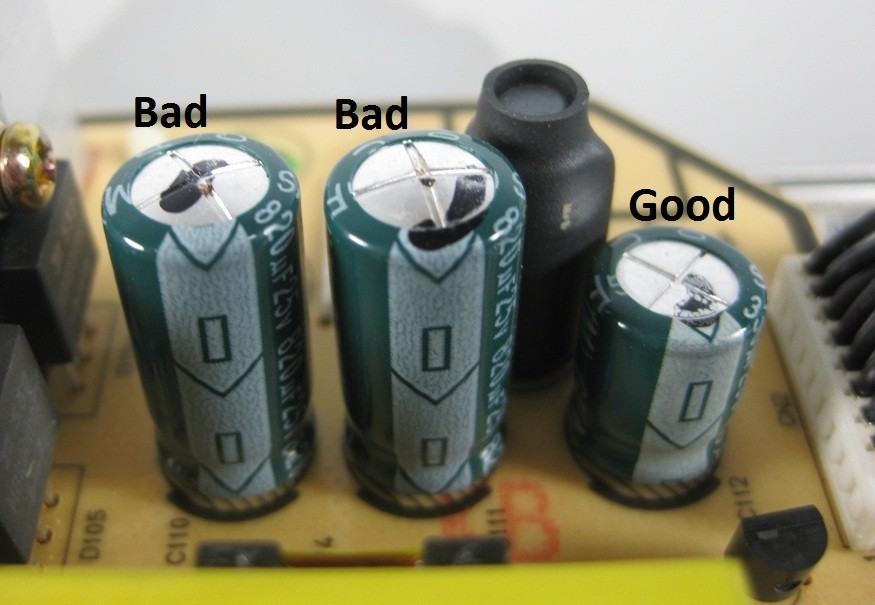
- Once you have the PSU board in your hand, look for bad capacitors.
- These are the large cylindrical shaped components, usually black, gray, or white in color.
- See if the capacitors are burnt or swollen abnormally. This shows that it has gone bad.
Step 5# Desoldering the Bad Capacitors
- Mark the bad capacitors and proceed to the next step.
- Take the soldering iron and desolder the bad capacitors out of the board.
- You might need to add some flux before desoldering.
Step 6# Soldering the New Capacitors
- Once the bad capacitors are out, you can replace them with new ones.
- Buy new capacitors that have the exact same specifications; otherwise, the PSU won’t work.
- Solder the new capacitors in their place.
Step 7# Reassembling the Power Supply Unit
- All looks good now. You can start putting back the PSU.
- Close the casing and attach all the cables you disconnected earlier.
- Test the PSU Before placing the IT back inside the PC and see if it works.
Step 8# Testing the Computer
- Attach the cables of the PSU to the motherboard and graphic card.
- Connect the PC power cable and turn on the power button.
- See if your PC is working fine. Congratulation, you have fixed the bad PC PSU.
Final Words; How to Fix a Bad PC Power Supply Unit (PSU)?
In this article, we saw how to diagnose a bad PC PSU. Then we saw the best way to fix a bad PC power supply unit, which is trying to change the bad capacitors.
Let me reiterate that fixing a bad PSU is a long shot with limited chances of success. However, replacing the bad capacitor is one way that may do the trick for you.
We hope that this article helps you in fixing the bad PC PSU. If it does work, kudos, and if it doesn’t, do let us know about your problem in detail. We may be able to help you out.